
Was kind of thinking the GUT Master himself was going to do a little how to on this but maybe we can get him to chime in on this and give us a few of his own ideas on how to clean a northern Canadian style. Anyone who has had the chance to watch him will admit he is a master when it comes to cleaning fish
STEP 1: Make first cut by grasping fish between the gills and poking knife into softer throat region ahead of the two front fins
STEP 2: Slide knife forward towards tail of fish between the two middle fins and stop by the bottom fin just in front of tail
STEP 3: Lay fish on side and make a vertical cut using a sawing motion down to the backbone taking care to NOT slice through the backbone.
STEP 4: Turn your knife flat and parallel to the backbone. Saw along the backbone (You'll hear rib-bones and "Y" bones being cut through) to the tail, removing the complete slab of fish meat (?) which is one fillet. Do this to each side of fish.
STEP 4a: Cutting gets easier near the tail no rib bones
STEP 5: Remove the belly fin by slicing with the tip of your knife.
STEP 5a: Removing fin is easy if you hold it up and slice it off.
STEP 6: Locate the row of rib bones on the fillet by feeling them with your finger. Then, place your knife edge right behind them and slice underneath. Remember to turn your knife blade up against the underside of the ribs immediately as you are making long, steady slices down the row of rib bones. The idea here is to remove the ribs without wasting meat.
STEP 6a: After slicing about half to three quarters of the way under the ribs, hold the fillet down with your knife point, grasp the ribs and tear them out. This move greatly speeds up the process and helps if you have a lot of fish to fillet. STEP 7: Grasp the tail of the fillet with pliers and cut into flesh with blade while turning blade almost flat and sawing. Simultaneously pull with the pliers and push with the knife with a sawing motion. It helps to waggle your plier hand from side to side as your knife hand saws down the skin of the fillet.
STEP 7a: Continue down the fillet. The feeling in the knife is one of slight tearing as it cuts. Too sharp of your blade angle and you slice through the hide. Too flat of a blade angle and you will leave meat on the hide. Your knife must be quite sharp and you'll need to develope a feel.
STEP 7b: If you will be transporting your fillets, turn your blade down and slice sideways leaving a patch of skin on the fillet for identification purposes.
STEP 8: Completed Northern Pike fillets will look like this if done properly. If they look like they were driven over by a streetsweeper, you'll need a bit more practise.
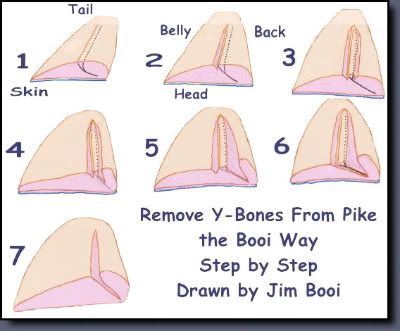
Here is a little diagram from Jim Booi to give you a better idea.

It looks so much easier when Gord does it.
ReplyDeleteThe method described above will work, but definately more complex than it needs to be. I will have to document the VBL method to post at a later date. In picture form on the blog, and if Andy and Joe can stay off the sauce for a day, perhaps we could do a video.
ReplyDelete"Grasp the tail of the fillet with pliers" !?? What an amateur!!!
Andy...I'm planning on being on the sauce when we return to VBL in August, perhaps heavily. What about you?
ReplyDeleteHey guy's think we all need to be on the sause when we have to be around Gord for a week
ReplyDeleteHey! Proper Northern pike Fillet!
ReplyDeleteLooks good.
I prefer to let most of my long green and mean pike swim back into Eagle Lake.
Chuck in Toronto
Hey Chuck
ReplyDeleteYou are missing out on some good eats here.
I am liking Northern more than walleye these days.
When you got Gord cleaning no bones to worry about.
A little sauce makes the fish look so much bigger and it can be very tasty. I do like Gord's technique better, especially when he's doing it and I'm observing while sipping the sauce.
ReplyDelete